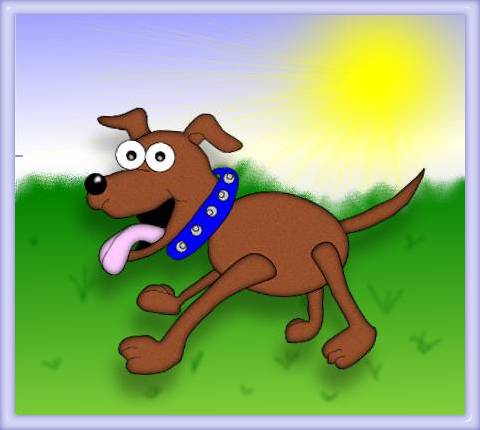
HAPPY FIDO TUTORIAL
Tools Needed:
PSP 7 (I'm sure this can be done in any version)
My selections ( Click Here)
The following directions are only meant to give some kind of guidelines for you to follow. I would encourage you though to try other combinations, textures, etc. In short, experiment and have fun. Remember though, if you move the selections around or resize them, they won't fit as they are shown in the example given.
1. Open a new image 600x450, transparent background. Hide layer one.
2. Create a new layer and name it "Back legs". Go to Selections, load from Disk, open bjh_hfbacklegs.sel, flood fill with Black, Contract 1, Flood fill with #98512E, Deselect, Select All, Float, Effects, Noise, Add Noise, 5% (Uniform), DO NOT DESELECT, Effects, 3D Effects, Cutout and use these settings:
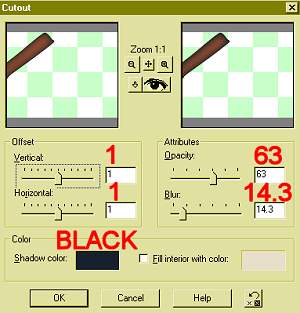
Apply the Cutout again but change the Vertical and Horizontal settings to -1. Deselect.
3. Add a new layer and name it "Tail". Go to Selections, load from Disk, open bjh_hftail.sel, Flood fill with Black, Modify, Contract 1, Flood fill with #98512E, Deselect, Select All, Float, Effects, Noise, Add Noise, 5% (Uniform) DO NOT DESELECT, Effects, 3D Effects, Cutout and use the same settings as in step 2. Apply Cutout again using -1 for Vertical and Horizontal. Deselect.
4. Add a new layer and name it "Body". Go to Selections, load from Disk, open bjh_hfbody.sel, Flood fill with Black, Modify, Contract 1, Flood fill with #98512E, Deselect, Select All, Float, Effects, Noise, Add Noise, 5% (Uniform) DO NOT DESELECT, Effects, 3D Effects, Cutout and use the same settings as in step 2. Apply Cutout again using -1 for Vertical and Horizontal. Deselect.
5. Add a new layer and name it "Front legs". Go to Selections, load from Disk, open bjh_hffrontlegs.sel, Flood fill with Black, Modify, Contract 1, Flood fill with #98512E, Deselect, Select All, Float, Effects, Noise, Add Noise, 5% (Uniform) DO NOT DESELECT, Effects, 3D Effects, Cutout and use the same settings as in step 2. Apply Cutout again using -1 for Vertical and Horizontal. Deselect.
6. Add a new layer and name it "Left ear". Go to Selections, load from Disk, open bjh_hfleftear.sel, Flood fill with Black, Modify, Contract 1, Flood fill with #98512E, Deselect, Select All, Float, Effects, Noise, Add Noise, 5% (Uniform) DO NOT DESELECT, Effects, 3D Effects, Cutout and use the same settings as in step 2. Apply Cutout again using -1 for Vertical and Horizontal. Deselect.
7. Add a new layer and name it "Mouth". Go to Selections, load from Disk, open bjh_hfmouth.sel, Flood fill with Black. Deselect.
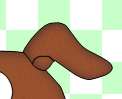
8. Add a new layer and name it "Head". Go to Selections, load from Disk, open bjh_hfhead.sel, Flood fill with Black, Modify, Contract 1, Flood fill with #98512E, Deselect, Select All, Float, Effects, Noise, Add Noise, 5% (Uniform) DO NOT DESELECT, Effects, 3D Effects, Cutout and use the same settings as in step 2. Apply Cutout again using -1 for Vertical and Horizontal. Deselect.
9. Add a new layer and name it "Tongue". Go to Selections, load from Disk, open bjh_hftongue.sel, Flood fill with Black, Modify, Contract 2, Flood fill with #FFCCFF, Deselect, Select All, Float, Effects, 3D Effects, Cutout and use the same settings as in step 2. Apply Cutout again using -1 for Vertical and Horizontal. Deselect.
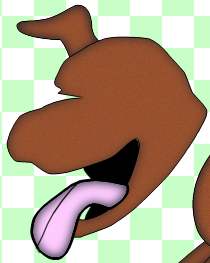
10. Staying on the tongue layer, select the Draw Tool and use either the Freehand or Point to Point (I can't draw very good so I use the Point to Point), width 1 and check only the Antialias box. Select Black for the foreground color and Null for the background. Draw a line to divide the tongue as shown:
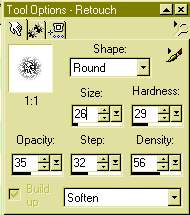
Select the Retouch tool and use the following settings:
Go over the line a couple of times or so to soften the line up as shown in the opening graphic.
11. Add a new layer and name it "Right ear". Go to Selections, load from Disk, open bjh_hfrightear.sel, Flood fill with Black, Modify, Contract 1, Flood fill with #98512E, Deselect, Select All, Float, Effects, Noise, Add Noise, 5% (Uniform) DO NOT DESELECT, Effects, 3D Effects, Cutout and use the same settings as in step 2. The Cutout will not be applied a second time. Deselect. Select Draw Tool, Width 1, Antialias checked, and Black for your foreground stroke color, background set at Null. Draw a line on the ear starting at the inner bend and going to the base of the ear as shown (omit this part if you use the details selections in Step 18):
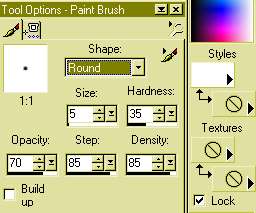
12. Add a new layer and name it "Nose". Go to Selections, load from Disk, open bjh_hfnose.sel, Flood fill with Black. DO NOT DESELECT. Add a new layer and name it "Nose highlight". Select the paintbrush tool and use the settings as shown below:
Paint a small arc similar to the one shown in the example:

Select Effects, Blur, Gaussian Blur, 1.5. Deselect.
13. Add a new layer and name it "Eyes". Go to Selections, load from Disk, open bjh_hfeyes.sel, Flood fill with Black, Modify, Contract 1, Flood fill with White. Deselect.
14. Add a new layer and name it "Eyeballs". Go to Selections, load from Disk, open bjh_hfeyeballs.sel, Flood fill with Black. Keeping it selected, add a new layer and name it Highlights (or if you do like I do, don't name it but when finished with this step, merge both layers and rename it to "eyeballs"). Select the Paintbrush tool and use the same settings as in step 12. Paint a small circle in each eye (about lower right) and apply the Gaussian Blur using the same setting as in step 12. Deselect.
15. Add a new layer and name it "Collar". Go to Selections, load from Disk, open bjh_hfcollar.sel, Flood fill with Black, Modify, Contract 1, Flood fill with a color of your choice (I used #0000FF). Deselect.
16. Add a new layer and name it "Bells". Go to Selections, load from Disk, open bjh_hfbells.sel, Flood fill with Black, Modify, Contract 1, Flood fill with#C0C0C0. Deselect.
17. Add a new layer and name it "Bell circles (or if you like, don't name it and when done with this step, merge both these layers together and rename it "Bells"). Select the preshapes tool, ellipse, width 1, Antialias checked, Foreground color Black, Background set to Null. Draw a small circle inside the bell with one of the sides touching. Copy and Paste Selection until all bells have an inner circle as shown below:
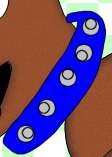
Hint: zoom in on this when drawing. I also pasted each circle in a
slightly different position each time.
18. Add a new layer and name it Details. Go to Selections, Load from Disk, open bjh_hfdetails.sel, Flood fill with Black (you may want to zoom in so you can get your cursor inside the lines). If you really feel brave and/or creative, you can try painting these details by hand. Use the Draw tool set at width 1, antialias checked, Freehand (or Point to Point) and color set at Black.
That's it! Hide Layer 1, merge the rest, merge visible. Now you can add a background (unhide layer 1 first of course) and resize it or Merge all layers visible and save it as a tube.
I hope you enjoyed this tutorial and if you have any questions or comments please email me
This web page is created and maintained by Hart's Haven. All graphics and page design within this site are made by and copyrighted to ©Hart's Haven, unless stated otherwise, and are not to be removed from this site without the express written permission from the owner of ©Hart's Haven.
Copyright ©2002
All rights reserved.